Let me first start by laying a disclaimer out. I am by no means the ventilation guru, but what I do have are a very particular set of skills, skills I have acquired over a very long career, skills that make me a nightmare for improper ventilation like you may have. Sorry I had to insert a famous movie quote there, I digress. This page is to give home-owners and even fellow roofing contractors that may have heard certain myths or theories involving ventilation practices. I have been roofing since 17 years old and naturally when I joined the fire service, they tried to utilize my previous life experience into a role that best fit my position within our organization. So I became a truckie, specializing in ventilation on the Ladder truck. Now we are not working under extreme fire conditions in this case, but we are trying to understand how proper intake and exhaust will provide longevity to your roof life. Some key points I have learned throughout training and certification courses is this. Intake vent low and exhaust vent high, have the proper amount, and short circuiting a flow path has been proven with studies. Check out the UL study on attic fires on Governors Island for some interesting studies performed. Here are some frequently asked questions, over the years. Below I will add a link: Florida Code for ventilation as well as add a ventilation calculator that I created for ease of access at the top and bottom of this page. You will still need to pick the proper vent for the job as well as divide the manufacturers NFA product spec. number.
Airing It out Podcast
Listen to Paul Scelsi (air vent) and Jason verbeke (The allard roofing company) discuss ventilation intake & exhaust. How it effects your overall roof life and the scene of a fire incident

To better understand attic ventilation, it is best to start with the basics. We will cover why you need ventilation, the most common type of ventilation, the building code requirements, and common ventilation-related issues (what not to do.)
Why Do You Need Attic Ventilation
Attic ventilation serves two main functions: to lower attic temperatures and to remove excess moisture. Lowering the temperature in the attic can help reduce air-conditioning energy costs and roof deck temperature, optimize the service life of a roof covering, and minimize ice damming. Some benefits of removing excess moisture include reducing the possibility for mold and mildew growth and minimizing the potential for wood rot. With this being said, ventilation IS NOT the fix all for roofing material life span. In Florida the color you choose will be just as significant if not more beneficial based on longevity of roofing materials.

Balance is the Key
Figure 1 – A balanced system. Figure courtesy of the NRCA.
There are two methods used to ventilate attics: static and mechanical. The most common method is the static method. This method relies on convection, which is a mode of heat transfer that is caused by the tendency of warmer air to rise. In other words, air flows through the attic space naturally, without the use of mechanical means.
Outside air enters the attic space through soffit or eave vents, rises through the attic space as it warms, and exits through vents that are positioned at or near the top. For this method to be most effective, approximately equal amounts of ventilation should be placed at the soffits or eave level, and at or near the top of the attic space. This is referred to as a “balanced system.” See Figure 1.

Figure 2 – A mechanical ventilation system. Figure courtesy of the NRCA.
The mechanical method uses some type of mechanical means, such as power vents, to generate air movement. Similar to the static method, adequate amounts of intake air into the attic space should be provided. See Figure 2.
According to the National Roofing Contractors Association (NRCA), a power vent with an airflow rate of 1.0 cubic foot per minute per square foot of attic space measured at the attic floor is generally considered to be equivalent to a 1:150 ventilation ratio.

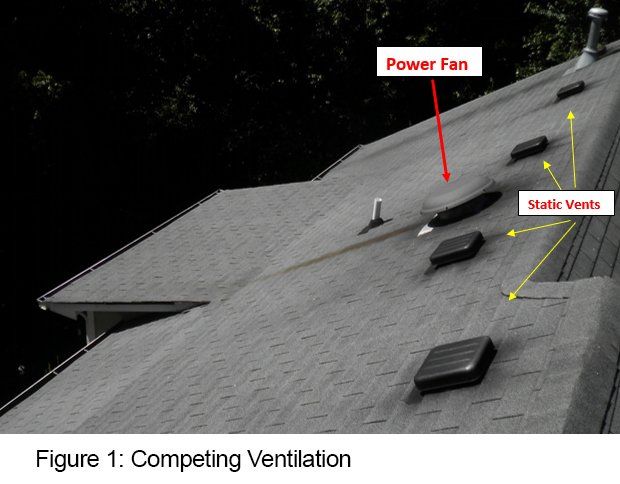
Figure 3 - A short circuit system.
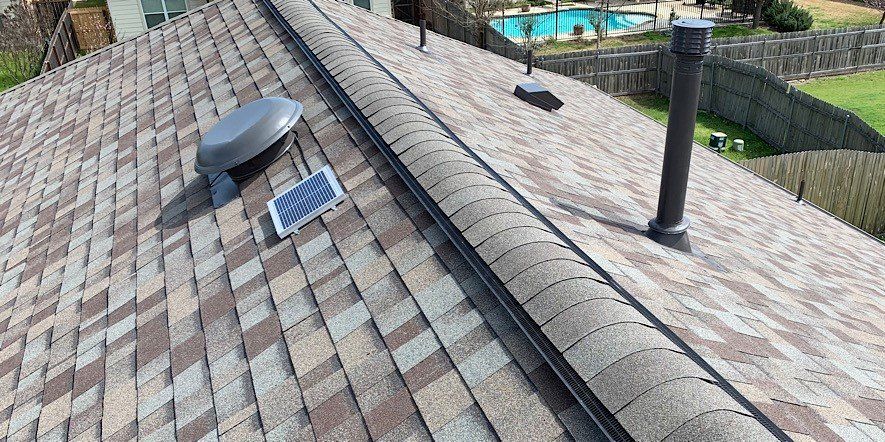
Most contractors have the old saying, the more ventilation, the better. Yet you couldn't be further from the truth (or proper way to ventilate). Flow path of attic air can change intended exhaust points into intakes and vice verse, could create a mechanical exhaust vent to suck in rain when combined with ridge vent, as well as cause air to circulate in a continuous loop within the attic space.

What Does The Code Require?
For the purposes of this article, only the 2018 edition of the International Residential Code (IRC) will be discussed. The majority of the requirements related to attic ventilation have not changed much from the previous editions.
The ventilation amount and opening size requirements can be found in Section 806, Roof Ventilation of Chapter 8, Roof-Ceiling Construction. The following are the requirements taken directly from the IRC:
R806.1
R806.1 Ventilation required.
Enclosed attics and enclosed rafter spaces formed where ceilings are applied directly to the underside of roof rafters shall have cross ventilation for each separate space by ventilating openings protected against the entrance of rain or snow. Ventilation openings shall have a least dimension of 1/16 inch (1.6 mm) minimum and 1/4 inch (6.4 mm) maximum. Ventilation openings having a least dimension larger than 1/4 inch (6.4 mm) shall be provided with corrosion-resistant wire cloth screening, hardware cloth, perforated vinyl, or similar material with openings having a least dimension of 1/16 inch (1.6 mm) minimum and 1/4 inch (6.4 mm) maximum. Openings in roof framing members shall conform to the requirements of Section R802.7. Required ventilation openings shall open directly to the outside air and shall be protected to prevent the entry of birds, rodents, snakes, and other similar creatures.
R806.2
R806.2 Minimum vent area.
The minimum net free ventilating area shall be 1/150 of the area of the vented space.
Exception: The minimum net free ventilation area shall be 1/300 of the vented space, provided both of the following conditions are met:
In Climate Zones 6, 7, and 8, a Class I or II vapor retarder is installed on the warm-in-winter side of the ceiling.
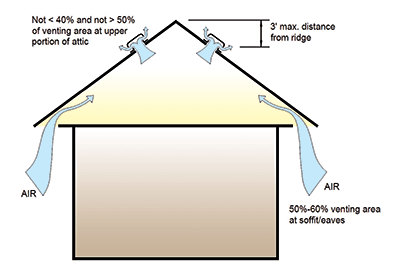
Not less than 40 percent and not more than 50 percent of the required ventilating area is provided by ventilators located in the upper portion of the attic or rafter space. Upper ventilators shall be located not more than 3 feet (914 mm) below the ridge or highest point of the space, measured vertically. The balance of the required ventilation provided shall be located in the bottom one-third of the attic space. Where the location of wall or roof framing members conflicts with the installation of upper ventilators, installation more than 3 feet (914 mm) below the ridge or highest point of the space shall be permitted.
Even though the primary code requirement is the 1:150 ratio, a 1:300 ratio is commonly used. In order to use 1:300, one must meet the two conditions in the exception. The first condition requires a Class I or II vapor retarder for buildings located in Climate Zones 6 through 8. An example for a Class I vapor retarder would be a polyethylene sheet, and it should be installed on the warm side of the attic insulation. A Class II vapor retarder could be kraft-faced fiberglass batt insulation installed at the attic floor with the kraft paper side facing down.
EXCEPTION
Figure 3 – Vent location and amount requirements for the second exception to Section R806.2 – Minimum vent area.
The second condition requires specifics on vent location in order to achieve a balanced system, as illustrated in Figure 3.
A noteworthy takeaway from this “exception” is that it is acceptable to have as much as 10% more than 50% of the ventilating area at the intake level. Additionally, it can be interpreted that it is not desirable to have more than 50% ventilating area at the exhaust level. Intake area should always be equal to or more than exhaust area, or intake air may be pulled from the interior of the building/residence through openings in the ceiling (e.g., can lights, attic access doors).
As previously mentioned, this article only addresses the 2018 IRC. It is important to verify with the building code official where the building is located which code has been adopted. Also keep in mind that state and local jurisdictions may add or delete portions of the model code or have local amendments.
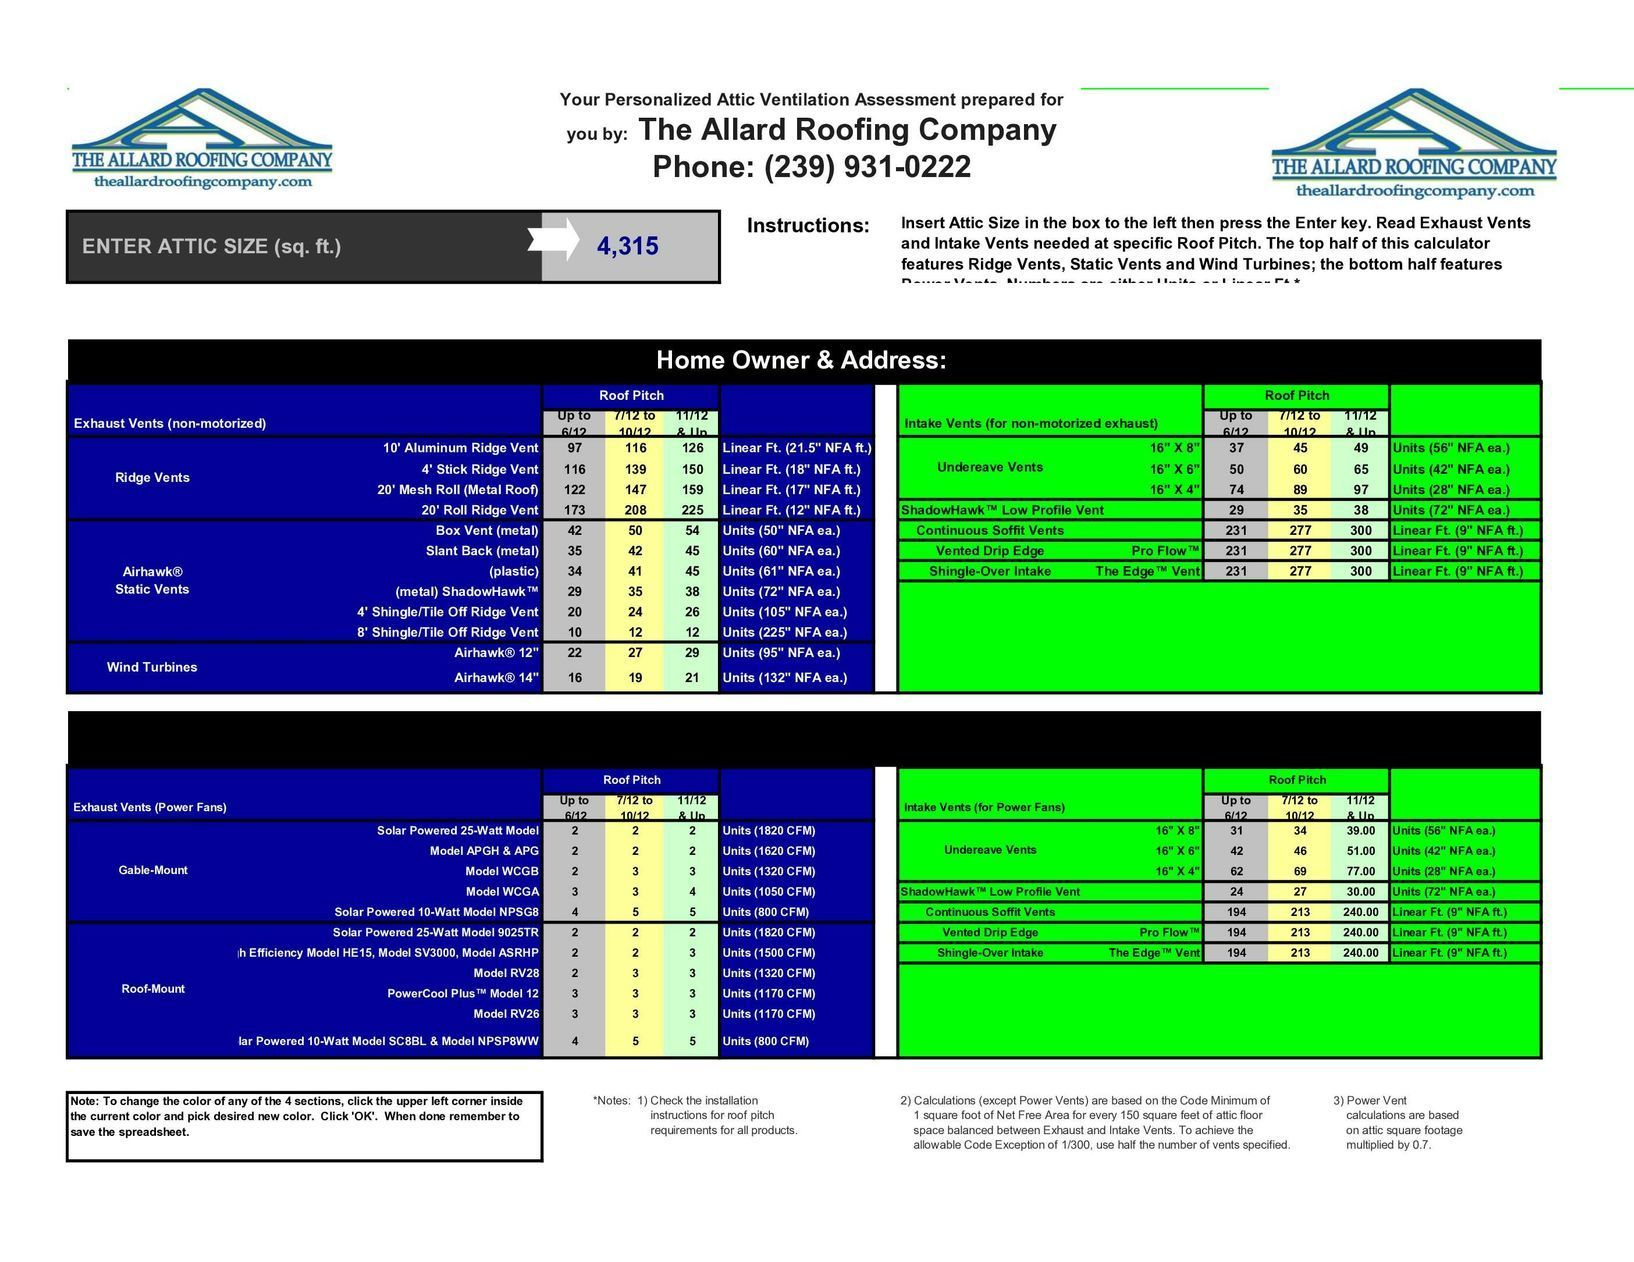
Crunching Numbers!
Doing the Math: An Example The starting point for any attic ventilation project is always: What is the size of the attic space we’re trying to vent? In other words, what’s the attic square footage? Let’s say the attic is 2,000 square feet (40 ft. length x 50 ft. width attic floor space). Here’s how the code minimum of 1/150 (1 sq. ft. of NFA for every 150 sq. ft. of attic floor space) looks on paper.
Attic Floor Area
Length x Width
Attic floor area =
40 ft. x 50 ft. = 2,000 sq. ft.
Determine the total NFA needed for the attic.
Balance System
50% intake vents and 50% exhaust vents=
=13.3 sq. ft. NFA needed ÷ 2
= 6.6 sq. ft. of intake Net Free Area needed and 6.6 sq. ft. of exhaust NFA needed.
Convert to Sq. Inches
Convert to square inches because that’s how vents are rated by manufacturers. =6.6 sq. ft. x 144 (the number of sq. in. per sq. ft.)
= 950 sq. in. of intake NFA needed and 950 sq. in. of exhaust NFA needed.
Pick Your Vents
It’s time to select a type of intake vent and a type of exhaust vent that is appropriate for the project and find out its NFA rating as supplied by the manufacturer. Manufacturers specify their vent NFA ratings in square inches per linear foot or per unit/vent. Member companies of the RAVC have a comprehensive offering of intake and exhaust vents. Visit www.ravcoalition.org for specific vent types and NFA specifications. Due to space limitations we will refer to intake and exhaust generically here.
Let’s say the “Intake Vent” and “Exhaust Vent” has the following NFA ratings measured per linear foot:
- Intake Vent: 9 sq. in. NFA per linear ft.
- Exhaust Vent: 18 sq. in. NFA per linear ft.
Number of vents
Determine the quantity of vents needed. We’ve reached the home stretch. It’s now time to determine how many of the vents selected in Step Five will be needed to provide the necessary NFA we calculated in Step Four.
For example:
- To achieve 950 sq. in. of intake NFA would require 106 linear ft. of the 9 sq. in. NFA Intake Vent (because 950 ÷ 9 = 106).
- To achieve 950 sq. in. of exhaust NFA would require 53 linear feet of the 18 sq. in. NFA Exhaust Vent (because 950 ÷ 18 = 53).
Vent Math Shortcut.
1/150=Divided by 2
1/300=Divided by 4
Here’s a Handy Shortcut While it’s good to know where the attic ventilation calculations come from – you may be pressed for time in some instances and cannot afford to go through the 5-step calculations just reviewed. Good news. Here’s a handy shortcut to the math.
Attic sq. ft. ÷ 2 = sq. in. of intake NFA and exhaust NFA needed @ 1/150 ratio. 2
Go back to Step 1. We used a 2,000 sq. ft. attic as our example. Now apply the shortcut. • 2,000 sq. ft. ÷ 2 = 1,000 sq. in. of intake NFA and 1,000 sq. in. of exhaust NFA. You’ll notice that in Step 3 we calculated 950 sq. in. of NFA intake and 950 sq. in. of exhaust NFA was needed. The shortcut overestimates a little but that’s OK. Hopefully you now have a better understanding of how to apply code requirements to actual projects. And if you’re in hurry just remember the “divide by 2” shortcut for 1/150 and "divide by 4" shortcut for 1/300